m (→top: Cleanup) |
DQueenie13 (wall | contribs) No edit summary |
||
| Line 11: | Line 11: | ||
{{Lang|'''Amakumo Peak'''|ja={{rubi|天|あま|雲|くも|峠|とうげ}}|ja_rm=Amakumo Touge}} is a location in [[Seirai Island]], [[Inazuma]]. |
{{Lang|'''Amakumo Peak'''|ja={{rubi|天|あま|雲|くも|峠|とうげ}}|ja_rm=Amakumo Touge}} is a location in [[Seirai Island]], [[Inazuma]]. |
||
| + | Long ago, [[Kanna Kapatcir]] was slain here, while the power of its lingering hatred and regret was suppressed by wards maintained by the [[Asase Shrine]]. During the Seirai Rebellion around 500 years ago, [[Asase Hibiki]] unsealed the wards, causing the [[Thunder Manifestation]] to appear and devastate the area with a massive Electro storm. |
||
<!-- |
<!-- |
||
==Description== |
==Description== |
||
--> |
--> |
||
==Notable Features== |
==Notable Features== |
||
| + | *[[Seirai Stormchasers: Part IV]] (World Quest) |
||
| + | *[[Electrograna]] |
||
| + | *[[Electro Water]] |
||
===Enemies=== |
===Enemies=== |
||
*{{Enemy|Thunder Manifestation|nobr=1}} |
*{{Enemy|Thunder Manifestation|nobr=1}} |
||
| + | *{{Enemy|Ruin Cruiser|nobr=1}} |
||
| ⚫ | |||
| + | *{{Enemy|Ruin Destroyer|nobr=1}} |
||
| + | *{{Enemy|Ruin Defender|nobr=1}} |
||
| + | *{{Enemy|Ruin Scout|nobr=1}} |
||
| + | |||
==Points of Interest== |
==Points of Interest== |
||
| + | ===The Summit=== |
||
| + | The fragmented summit of Amakumo Peak is now home to the [[Thundering Manifestation]]. This area is unlocked and navigated as part of [[Seirai Stormchasers: Part IV]]. |
||
| + | ===The Lake=== |
||
| + | The lake at the base of Amakumo Peak is filled with [[Electro Water]] and the surrounding area is roamed by many [[Ruin Sentinel]]s. However, by solving the [[Light-Up Tile Puzzles|Light-Up Tile Puzzle]], a mechanism is unlocked that drains the water from the area and nullifies its Electro effect. After being drained, ruins leading to an underground settlement are revealed. |
||
| + | |||
| + | ===Underground Settlement=== |
||
| ⚫ | |||
==NPCs== |
==NPCs== |
||
| Line 33: | Line 48: | ||
--> |
--> |
||
==Puzzle== |
==Puzzle== |
||
| ⚫ | |||
| − | At the center of the shoreline of the lake lies a [[Light-Up Tile Puzzles|Light-Up Tile Puzzle]] |
+ | At the center of the shoreline of the lake lies a [[Light-Up Tile Puzzles|Light-Up Tile Puzzle]] (see image for solution). Solving the puzzle spawns an Exquisite Chest and the mechanism to the right unlocks. The clues for which tiles to light up are scattered across three areas on the island, with the position of the fire brazier acting as the anchor to match the position of the tiles in the clues with the position in the main puzzle. Activating the mechanism drains the lake, revealing an [[Electroculus]] and the opening to a cavern below and three [[Ruin Sentinels]]. |
| ⚫ | |||
| + | |||
Inside the first level of the cavern houses another locked mechanism. Descending into the cavern spawns a locked Exquisite Chest and two more Ruin Sentinels. Defeating these Sentinels unlocks the chest and the mechanism. Activating this mechanism drains the water inside and reveals the second level of the cavern, an expansive maze-like ruin. |
Inside the first level of the cavern houses another locked mechanism. Descending into the cavern spawns a locked Exquisite Chest and two more Ruin Sentinels. Defeating these Sentinels unlocks the chest and the mechanism. Activating this mechanism drains the water inside and reveals the second level of the cavern, an expansive maze-like ruin. |
||
==Video Guides== |
==Video Guides== |
||
<gallery hideaddbutton="true" captionalign="center"> |
<gallery hideaddbutton="true" captionalign="center"> |
||
| − | How to remove electric barrier(unlock Amakumo peak)Seirai stormchasers part 1,2,3,4 Genshin impact|How to Unlock Amakumo |
+ | How to remove electric barrier(unlock Amakumo peak)Seirai stormchasers part 1,2,3,4 Genshin impact|How to Unlock Amakumo Peak |
</gallery> |
</gallery> |
||
==Change History== |
==Change History== |
||
| − | {{Change History|2. |
+ | {{Change History|2.1}} |
==Navigation== |
==Navigation== |
||
Revision as of 23:20, 26 October 2021
Amakumo Peak (Japanese: 天雲峠 Amakumo Touge) is a location in Seirai Island, Inazuma.
Long ago, Kanna Kapatcir was slain here, while the power of its lingering hatred and regret was suppressed by wards maintained by the Asase Shrine. During the Seirai Rebellion around 500 years ago, Asase Hibiki unsealed the wards, causing the Thunder Manifestation to appear and devastate the area with a massive Electro storm.
Notable Features
- Seirai Stormchasers: Part IV (World Quest)
- Electrograna
- Electro Water
Enemies
Points of Interest
The Summit
The fragmented summit of Amakumo Peak is now home to the Thundering Manifestation. This area is unlocked and navigated as part of Seirai Stormchasers: Part IV.
The Lake
The lake at the base of Amakumo Peak is filled with Electro Water and the surrounding area is roamed by many Ruin Sentinels. However, by solving the Light-Up Tile Puzzle, a mechanism is unlocked that drains the water from the area and nullifies its Electro effect. After being drained, ruins leading to an underground settlement are revealed.
Underground Settlement
Puzzle
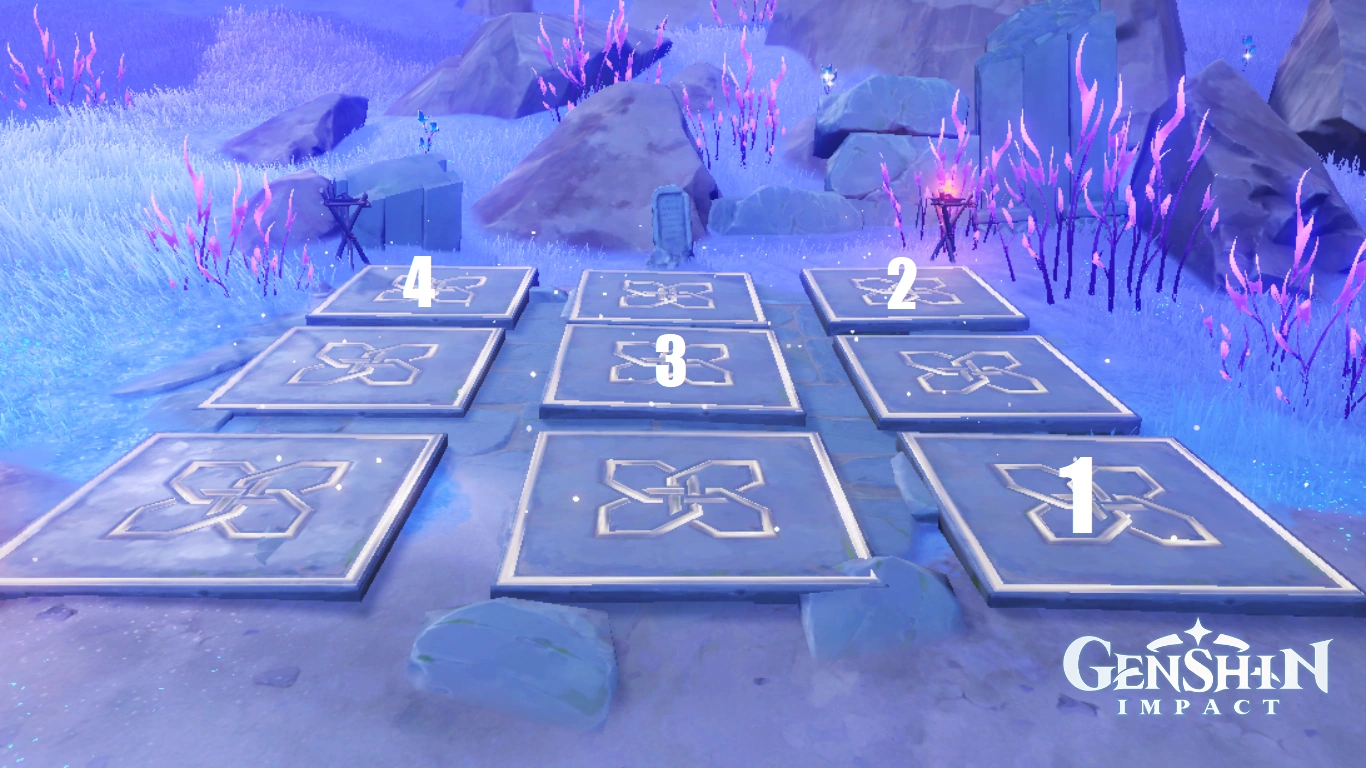

At the center of the shoreline of the lake lies a Light-Up Tile Puzzle (see image for solution). Solving the puzzle spawns an Exquisite Chest and the mechanism to the right unlocks. The clues for which tiles to light up are scattered across three areas on the island, with the position of the fire brazier acting as the anchor to match the position of the tiles in the clues with the position in the main puzzle. Activating the mechanism drains the lake, revealing an Electroculus and the opening to a cavern below and three Ruin Sentinels.
Inside the first level of the cavern houses another locked mechanism. Descending into the cavern spawns a locked Exquisite Chest and two more Ruin Sentinels. Defeating these Sentinels unlocks the chest and the mechanism. Activating this mechanism drains the water inside and reveals the second level of the cavern, an expansive maze-like ruin.


